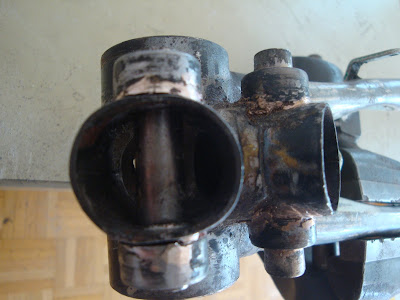
I first noticed the crack in the front fixation point due to the effect on frame lateral stiffness during the way back home in the maiden trip. It was rather demoralizing, after so much work put into this project, so I let the bike sit for a couple of weeks before I came up with a new set of ideas.
Finally, I took apart the fixation and proceeded with the root cause analysis of the failure. My fixation design was flawed, as the lateral compression stresses cannot be taken by the short stem from the original down tube of the donor bicycle. I totally underestimated the level of those localized stresses. In the next two pictures the extent and mechanism of the damage can be seen.
The plan was to reinforce the tube with an inner plug. The same plug is to be used as a tool to stretch the cross section of the tube back to round. Below you can see the plug being turned in the Unimat out of a massive steel bar from an old spark plug tool. A conical shape was machined in the tip to open up the deformed tube cross section.
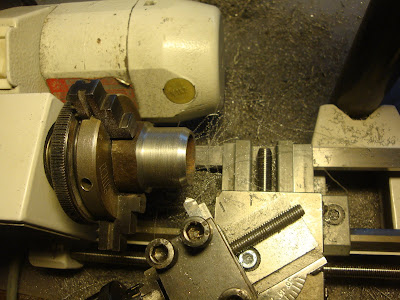
Fitting the plug into the tube.
Cross section back to perfect round shape. At this point, as I noticed that it was not very difficult to bring the tube back to shape again, I realized that the reinforcement should have been planned in the first place.
Even if it did not fail yet, I decided to apply a similar reinforcement to the rear fixation support. The only difference is that for the front plug I will drill again the hole for the transversal tube; for the rear fixation I carved a notch in the plug in order to mount it without ondoing the brazings in the fixation that did not fail.
Additionally, I decided to apply a set of lateral brackets to further reinforce the front fixation point. I started with a rectangular piece of a 1.5 mm steel plate and shaped the curve around a tube with the same diameter as the donor bike's down tube.
A little bending here and there, fluxed... and ready to braze.
Here is the final result. It might not look very delicate, but solid it is.
And after a couple hundred kilometers, it is still in perfect condition.
Evolution
Saturday, April 9, 2011
Saturday, April 2, 2011
Maiden trip
Finally, on a sunny Saturday in April I took the bike for a test ride. The work is far from being finished, but a ride at this point was necessary, with the following goals
- to test the riding stability and steering geometry,
- to test the riding position for ergonomics and confort
- to check the strenght of the different components,
- to discover weak points and derive ideas for modifications
- to discover potential for improvement in my recreation of the Pedersen concept
I recognize that these goals are too ambitious for a first ride. The testing phase will be extended during some time, probably the first 500 km or so, before I can finalize the details, install all the accessories and then disassemble for painting.
Here are a couple of pictures of the bike at the moment of the test ride. No details yet at all: no rear mudguard, no chainguard, the gear shifter just tied to the seat belt, etc. However, the bike is perfectly functional with 5 speed gear internal hub with backpedal coaster brake and front caliper brake. I took my legendary green triangle tool-bag with me, just in case.
Here is a video of my shade, to get a more dynamic impression.
The maiden trip and test ride covered a 50km roundtrip from home and back, without major incidents.
Some conclusions of in the following
Steering geometry and stability
Riding stability proved very satisfactory. The bike was really stable and fun to ride. Several times riding downhill I surpassed 30-35 km/h with a very stable handling. In spite of the shallow rake angle of 66 deg, the trail I designed for the steering geometry proved right.
Ergonomics and confort
Pedalling position is very confortable. The archetypical riding position of leaning over the handlebars changes with the Pedersen concept towards a straight and confortable upright back position. This position, of course, is suitable for confortable cruising, but is less suitable for unleashing bursts of pedalling power while climbing hills or accelerating the vessel. Standing on the pedals is not possible, as the seat and handlebars are positioned rather to the rear, compared with a standard bicycle. The handlebars in this particular bike proved to be rather low and this needs to be corrected. Also the angle setting of the handlebars needs improvement for added confort on the wrist position.
Weak points
The front fixation point suffered due to deformation of the tube out of round. As can be seen in the pictures below, the very high lateral localized stresses introduced by the tubes connected to the head tube and to the fork bracket did deform the cross section of the tube and cracked the brazing joint in one side. The crack happened after about 20 km. At the beginning the problem was barely noticeable, and then it was increasing towards the end of the trip as lateral rigidity of the frame was being affected along with further deformation of the tube. In the picture you can see the final condition after 50 km. However, the bike came back home in one piece.
The rear fixation point did not suffer any cracks. The main difference being that it was subjected to steady loading from the saddle support beams, instead of the alternating loading left and right transmitted by the fork support to the front fixation and derived from the pedalling action.
Subscribe to:
Posts (Atom)